Upon review, the year 2024 was the year of Generative AI (GenAI) adoption with a focus on secure, scalable, and easy-to-deploy solutions. Red Hat OpenShift AI is a flexible, scalable artificial intelligence and machine learning (AI/ML) platform that enables enterprises to create and deliver AI-enabled applications at scale across hybrid cloud environments. It provides the best-in-class MLOps platform for building, training, deploying, and monitoring AI models and applications at scale across hybrid cloud environments.
NVIDIA NIM is a set of easy-to-use microservices for accelerating the deployment of foundation models on any cloud or data center. It offers optimized inference microservices for deploying AI models at scale. This article demonstrates how to set up NVIDIA NIM on Red Hat OpenShift AI and discusses the benefits.
The benefits of NVIDIA NIM
The availability of NVIDIA NIM on OpenShift AI accelerates the delivery of GenAI applications for faster time to value and enables the following benefits:
- Ease of deployment and scale: You can deploy and scale NVIDIA NIM with a consistent platform across hybrid cloud environments.
- AI/ML maximum performance: You can access optimized NVIDIA NIM for inference on the most optimal, scalable, and secure platform.
- Quick on-demand access: Provides self-service access to NVIDIA NIM and streamline the delivery of AI-enabled apps.
Figure 1 depicts the combined stack of NVIDIA and Red Hat OpenShift AI on Red Hat OpenShift.

NVIDIA NIM is a containerized inference microservice that includes industry-standard APIs, domain-specific code, optimized inference engines, and enterprise runtime (Figure 2).

The core benefits of NVIDIA NIM and Red Hat OpenShift AI are as follows.
Benefits of NVIDIA NIM:
Deploy anywhere.
Develop with industry-standard APIs.
Leverage domain-specific models.
Run on optimized inference engines.
Support for enterprise-grade AI.
Benefits of Red Hat OpenShift AI:
Bring AI-enabled apps to production faster.
Flexibility across the hybrid cloud.
Less time managing AI infrastructure.
Tested and supported AI/ML tooling.
Leverage our best practices.
With Red Hat’s focus on hybrid and multi-cloud “deploy anywhere” strategy, NVIDIA NIM offers a substantial advantage to enterprise customers.
How to set up and deploy NVIDIA NIM
The following steps describe how to set up NVIDIA NIM on Red Hat OpenShift AI.
Log in to NVIDIA NGC and select Setup to create your key. Note that you need to have an enterprise license. You will get a 90-day trial license if you register as a NVIDIA developer and request an enterprise license.
Select Generate API Key as shown in Figure 3.

Click the Generate API Key button once again on the next screen (Figure 4). Then copy and save this key for the next step.

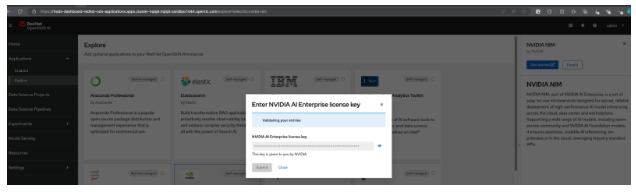
Navigate to OpenShift AI -> Applications -> Explore and Enable NVIDIA NIM (Figure 5). It will ask for the key you generated in the previous step. Once you enter the key, it takes a couple of minutes to complete the process.
Once enabled, you should see NVIDIA NIM in the Applications -> Enabled section (Figure 6).

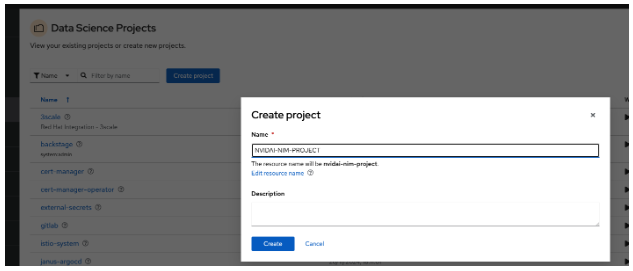
To use NVIDIA NIM, you need to create a Data Science Project called “NVIDIA-NIM-PROJECT” and go to the Models tab (Figure 7).
In the Models tab, you should also see the NIM serving platform. If not, then you need to enable it in the OpenShift AI Dashboard (Figure 8). Here, you do not see the NIM tile, so you need to enable it manually in the dashboard.

Go to OpenShift -> API Explorer and search "OdhDashboardConfig" in the redhat-ods-applications project (Figure 9).

Select OdhDashboardConfig then go to the Instances tab and select odh-dashboard-config (Figure 10).

Under the YAML tab in the spec section, you will see
disableNIMModelServing: true.Change this to
falseto make the NIM tile visible in the Models tab on the OpenShift AI Dashboard as shown in Figure 11 and save it.

For the NVIDIA NIM model serving platform to be visible in the Models tab in your project, log in again to the Red Hat OpenShift AI dashboard and refresh after two or three minutes (Figure 12).

Now you can deploy the models from NVIDIA NIM by selecting Deploy from the NVIDIA NIM tile (Figure 13).

This will start the deploying of the model, using NVIDIA NIM runtime and inference services. Make sure that you have sufficient resources to run the model on your Red Hat OpenShift cluster.
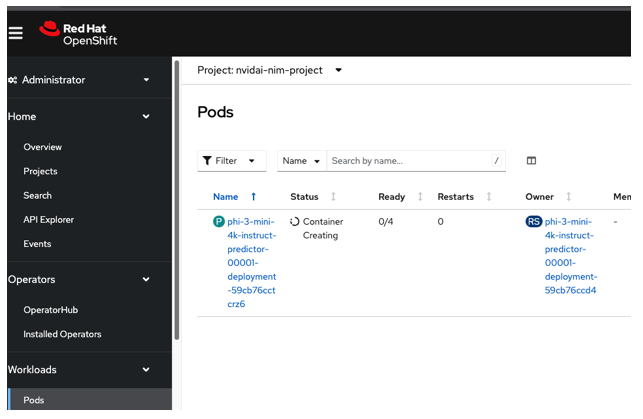
The pod will be scheduled. Once all four containers in the pod are ready in Red Hat OpenShift, the same will be reflected in Red Hat OpenShift AI, as shown in Figure 14.
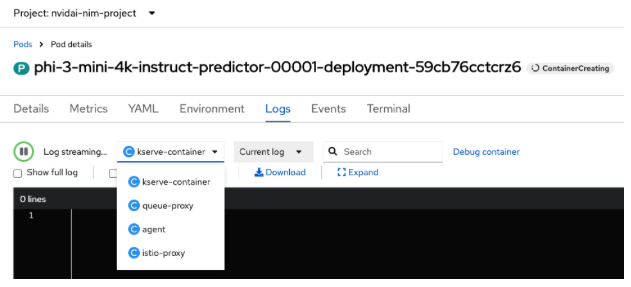
There are four containers in the pod (Figure 15).
The following shows the runtime ServingRuntime created in this project:
apiVersion: serving.kserve.io/v1alpha1
kind: ServingRuntime
metadata:
  annotations:
    opendatahub.io/accelerator-name: migrated-gpu
    opendatahub.io/apiProtocol: REST
    opendatahub.io/recommended-accelerators: '["nvidia.com/gpu"]'
    opendatahub.io/template-display-name: NVIDIA NIM
    opendatahub.io/template-name: nvidia-nim-runtime
    openshift.io/display-name: phi-3-mini-4k-instruct
  resourceVersion: '1385642'
  name: phi-3-mini-4k-instruct
  namespace: nvidai-nim-project
  labels:
    opendatahub.io/dashboard: 'true'
spec:
  containers:
    - env:
        - name: NIM_CACHE_PATH
          value: /mnt/models/cache
        - name: NGC_API_KEY
          valueFrom:
            secretKeyRef:
              key: NGC_API_KEY
              name: nvidia-nim-secrets
      image: 'nvcr.io/nim/microsoft/phi-3-mini-4k-instruct:1'
      name: kserve-container
      ports:
        - containerPort: 8000
          protocol: TCP
      volumeMounts:
        - mountPath: /dev/shm
          name: shm
        - mountPath: /mnt/models/cache
          name: nim-pvc-1732708712714pkx2u69rm9
  imagePullSecrets:
    - name: ngc-secret
  multiModel: false
  protocolVersions:
    - grpc-v2
    - v2
  supportedModelFormats:
    - autoSelect: true
      name: phi-3-mini-4k-instruct
      priority: 1
      version: '1'
  volumes:
    - name: nim-pvc-1732708712714pkx2u69rm9
      persistentVolumeClaim:
        claimName: nim-pvc-1732708712714pkx2u69rm9
    - emptyDir:
        medium: Memory
        sizeLimit: 2Gi
      name: shm
The inference service will appear as follows:
apiVersion: serving.kserve.io/v1alpha1
kind: ServingRuntime
metadata:
  annotations:
    opendatahub.io/accelerator-name: migrated-gpu
    opendatahub.io/apiProtocol: REST
    opendatahub.io/recommended-accelerators: '["nvidia.com/gpu"]'
    opendatahub.io/template-display-name: NVIDIA NIM
    opendatahub.io/template-name: nvidia-nim-runtime
    openshift.io/display-name: phi-3-mini-4k-instruct
  resourceVersion: '1385642'
  name: phi-3-mini-4k-instruct
  namespace: nvidai-nim-project
  labels:
    opendatahub.io/dashboard: 'true'
spec:
  containers:
    - env:
        - name: NIM_CACHE_PATH
          value: /mnt/models/cache
        - name: NGC_API_KEY
          valueFrom:
            secretKeyRef:
              key: NGC_API_KEY
              name: nvidia-nim-secrets
      image: 'nvcr.io/nim/microsoft/phi-3-mini-4k-instruct:1'
      name: kserve-container
      ports:
        - containerPort: 8000
          protocol: TCP
      volumeMounts:
        - mountPath: /dev/shm
          name: shm
        - mountPath: /mnt/models/cache
          name: nim-pvc-1732708712714pkx2u69rm9
  imagePullSecrets:
    - name: ngc-secret
  multiModel: false
  protocolVersions:
    - grpc-v2
    - v2
  supportedModelFormats:
    - autoSelect: true
      name: phi-3-mini-4k-instruct
      priority: 1
      version: '1'
  volumes:
    - name: nim-pvc-1732708712714pkx2u69rm9
      persistentVolumeClaim:
        claimName: nim-pvc-1732708712714pkx2u69rm9
    - emptyDir:
        medium: Memory
        sizeLimit: 2Gi
      name: shm
The following is the status once the inference service is successfully started:
status:
  address:
    url: 'http://phi-3-mini-4k-instruct.nvidai-nim-project.svc.cluster.local'
  components:
    predictor:
      address:
        url: 'http://phi-3-mini-4k-instruct-predictor.nvidai-nim-project.svc.cluster.local'
      latestCreatedRevision: phi-3-mini-4k-instruct-predictor-00001
      latestReadyRevision: phi-3-mini-4k-instruct-predictor-00001
      latestRolledoutRevision: phi-3-mini-4k-instruct-predictor-00001
      traffic:
        - latestRevision: true
          percent: 100
          revisionName: phi-3-mini-4k-instruct-predictor-00001
      url: 'http://phi-3-mini-4k-instruct-predictor.nvidai-nim-project.svc.cluster.local'
  conditions:
    - lastTransitionTime: '2024-11-27T12:04:38Z'
      status: 'True'
      type: IngressReady
    - lastTransitionTime: '2024-11-27T12:04:37Z'
      severity: Info
      status: 'True'
      type: LatestDeploymentReady
    - lastTransitionTime: '2024-11-27T12:04:37Z'
      severity: Info
      status: 'True'
      type: PredictorConfigurationReady
    - lastTransitionTime: '2024-11-27T12:04:38Z'
      status: 'True'
      type: PredictorReady
    - lastTransitionTime: '2024-11-27T12:04:38Z'
      severity: Info
      status: 'True'
      type: PredictorRouteReady
    - lastTransitionTime: '2024-11-27T12:04:38Z'
      status: 'True'
      type: Ready
    - lastTransitionTime: '2024-11-27T12:04:38Z'
      severity: Info
      status: 'True'
      type: RoutesReady
  modelStatus:
    copies:
      failedCopies: 0
      totalCopies: 1
    states:
      activeModelState: Loaded
      targetModelState: Loaded
    transitionStatus: UpToDate
  observedGeneration: 1
  url: 'http://phi-3-mini-4k-instruct.nvidai-nim-project.svc.cluster.local'
Once the pod is running fine, then the model status will turn green.
Note that you need to have sufficient resources (i.e., GPU and related memory) to deploy the model in consideration. This is called a profile for a specific model. You must find the right profile which in turn talks about the resource requirements for each NVIDIA NIM supported model found here.
The following is the Python code to access the NVIDIA NIM model:
from openai import OpenAI
client = OpenAI(
  base_url = "http://integrate.api.nvidia.com/v1",
  api_key = "$API_KEY_REQUIRED_IF_EXECUTING_OUTSIDE_NGC"
)
completion = client.chat.completions.create(
  model="meta/llama-3.1-70b-instruct",
  messages=[{"role":"user","content":"What are benefits of NVIDIA NIM on Red Hat OpenShift AI?"}],
  temperature=0.2,
  top_p=0.7,
  max_tokens=1024,
  stream=True
)
for chunk in completion:
  if chunk.choices[0].delta.content is not None:
    print(chunk.choices[0].delta.content, end="")
I have connected the llama-3.1-70b-instruct model deployed using NVIDIA NIM and this code. Looking at the question I asked, I got a good response from the model. The following is a copy of the llama-3.1-70b-instruct model hosted on NVIDIA NIM.
NVIDIA NIM (NVIDIA AI Enterprise Infrastructure Monitoring) on Red Hat OpenShift AI provides several benefits for AI and data science workloads. Here are some of the key advantages:
- Simplified AI infrastructure management: NIM provides a unified view of the entire AI infrastructure, including NVIDIA GPUs, Red Hat OpenShift clusters, and AI workloads. This simplifies management, monitoring, and troubleshooting of AI environments.
- Real-time monitoring and alerting: NIM offers real-time monitoring of GPU utilization, temperature, and other key metrics. This enables administrators to quickly identify and respond to issues, reducing downtime and improving overall system efficiency.
- AI workload optimization: NIM provides insights into AI workload performance, allowing administrators to optimize resource allocation, prioritize workloads, and ensure that critical tasks are completed efficiently.
- GPU resource utilization: NIM helps optimize GPU resource utilization, ensuring that these valuable resources are allocated effectively and minimizing waste.
- Integration with Red Hat OpenShift: NIM integrates seamlessly with Red Hat OpenShift, providing a single pane of glass for managing both the AI infrastructure and the containerized workloads running on it.
- Scalability and flexibility: NIM supports large-scale AI deployments, making it an ideal solution for enterprises with complex AI environments.
- Security and compliance: NIM provides robust security features, including role-based access control, encryption, and auditing to ensure that AI environments meet stringent security and compliance requirements.
- Improved collaboration: NIM enables data scientists, developers, and IT administrators to collaborate more effectively, sharing insights and best practices to drive AI innovation.
- Reduced costs: By optimizing AI infrastructure and workload performance, NIM helps reduce costs associated with GPU resources, energy consumption, and infrastructure maintenance.
- Faster time-to-insight: NIM accelerates the AI development lifecycle by providing real-time insights, automating workflows, and streamlining the deployment of AI models.
By combining NVIDIA NIM with Red Hat OpenShift AI, organizations can create a powerful AI platform that accelerates innovation, improves efficiency, and drives business success.
Efficient model deployment and responses
Red Hat OpenShift AI with NVIDIA NIM offers tremendous opportunities for enterprises to deploy models anywhere, focusing on secure, scalable, and easy-to-deploy solutions. Getting the right hardware profile to deploy your model is important for efficient responses from your model.
Get started with Red Hat OpenShift AI learning paths and our free Developer Sandbox.
