Redhat Developers  Logo
  • Products

    Featured

    • Red Hat Enterprise Linux
      Red Hat Enterprise Linux Icon
    • Red Hat OpenShift AI
      Red Hat OpenShift AI
    • Red Hat Enterprise Linux AI
      Linux icon inside of a brain
    • Image mode for Red Hat Enterprise Linux
      RHEL image mode
    • Red Hat OpenShift
      Openshift icon
    • Red Hat Ansible Automation Platform
      Ansible icon
    • Red Hat Developer Hub
      Developer Hub
    • View All Red Hat Products
    • Linux

      • Red Hat Enterprise Linux
      • Image mode for Red Hat Enterprise Linux
      • Red Hat Universal Base Images (UBI)
    • Java runtimes & frameworks

      • JBoss Enterprise Application Platform
      • Red Hat build of OpenJDK
    • Kubernetes

      • Red Hat OpenShift
      • Microsoft Azure Red Hat OpenShift
      • Red Hat OpenShift Virtualization
      • Red Hat OpenShift Lightspeed
    • Integration & App Connectivity

      • Red Hat Build of Apache Camel
      • Red Hat Service Interconnect
      • Red Hat Connectivity Link
    • AI/ML

      • Red Hat OpenShift AI
      • Red Hat Enterprise Linux AI
    • Automation

      • Red Hat Ansible Automation Platform
      • Red Hat Ansible Lightspeed
    • Developer tools

      • Red Hat Trusted Software Supply Chain
      • Podman Desktop
      • Red Hat OpenShift Dev Spaces
    • Developer Sandbox

      Developer Sandbox
      Try Red Hat products and technologies without setup or configuration fees for 30 days with this shared Openshift and Kubernetes cluster.
    • Try at no cost
  • Technologies

    Featured

    • AI/ML
      AI/ML Icon
    • Linux
      Linux Icon
    • Kubernetes
      Cloud icon
    • Automation
      Automation Icon showing arrows moving in a circle around a gear
    • View All Technologies
    • Programming Languages & Frameworks

      • Java
      • Python
      • JavaScript
    • System Design & Architecture

      • Red Hat architecture and design patterns
      • Microservices
      • Event-Driven Architecture
      • Databases
    • Developer Productivity

      • Developer productivity
      • Developer Tools
      • GitOps
    • Secure Development & Architectures

      • Security
      • Secure coding
    • Platform Engineering

      • DevOps
      • DevSecOps
      • Ansible automation for applications and services
    • Automated Data Processing

      • AI/ML
      • Data Science
      • Apache Kafka on Kubernetes
      • View All Technologies
    • Start exploring in the Developer Sandbox for free

      sandbox graphic
      Try Red Hat's products and technologies without setup or configuration.
    • Try at no cost
  • Learn

    Featured

    • Kubernetes & Cloud Native
      Openshift icon
    • Linux
      Rhel icon
    • Automation
      Ansible cloud icon
    • Java
      Java icon
    • AI/ML
      AI/ML Icon
    • View All Learning Resources

    E-Books

    • GitOps Cookbook
    • Podman in Action
    • Kubernetes Operators
    • The Path to GitOps
    • View All E-books

    Cheat Sheets

    • Linux Commands
    • Bash Commands
    • Git
    • systemd Commands
    • View All Cheat Sheets

    Documentation

    • API Catalog
    • Product Documentation
    • Legacy Documentation
    • Red Hat Learning

      Learning image
      Boost your technical skills to expert-level with the help of interactive lessons offered by various Red Hat Learning programs.
    • Explore Red Hat Learning
  • Developer Sandbox

    Developer Sandbox

    • Access Red Hat’s products and technologies without setup or configuration, and start developing quicker than ever before with our new, no-cost sandbox environments.
    • Explore Developer Sandbox

    Featured Developer Sandbox activities

    • Get started with your Developer Sandbox
    • OpenShift virtualization and application modernization using the Developer Sandbox
    • Explore all Developer Sandbox activities

    Ready to start developing apps?

    • Try at no cost
  • Blog
  • Events
  • Videos

Deliver generative AI at scale with NVIDIA NIM on OpenShift AI

Accelerate your application development at scale

March 26, 2025
Tomer Figenblat
Related topics:
Artificial intelligenceData ScienceHybrid CloudMicroservices
Related products:
Red Hat OpenShift AI

Share:

    Native support for NVIDIA NIM microservices is now generally available on Red Hat OpenShift AI to help streamline inferencing for dozens of AI/ML models on a consistent, flexible hybrid cloud platform. NVIDIA NIM, part of the NVIDIA AI Enterprise software platform, is a set of easy-to-use inference microservices for accelerating the deployment of foundation models and keeping your data secured.

    With NVIDIA NIM on OpenShift AI, data scientists, engineers, and application developers can collaborate in a single destination that promotes consistency, security and scalability, driving faster time-to-market of applications.

    This how-to article will help you get started with creating and delivering AI-enabled applications with NVIDIA NIM on OpenShift AI. 

    Enable NVIDIA NIM

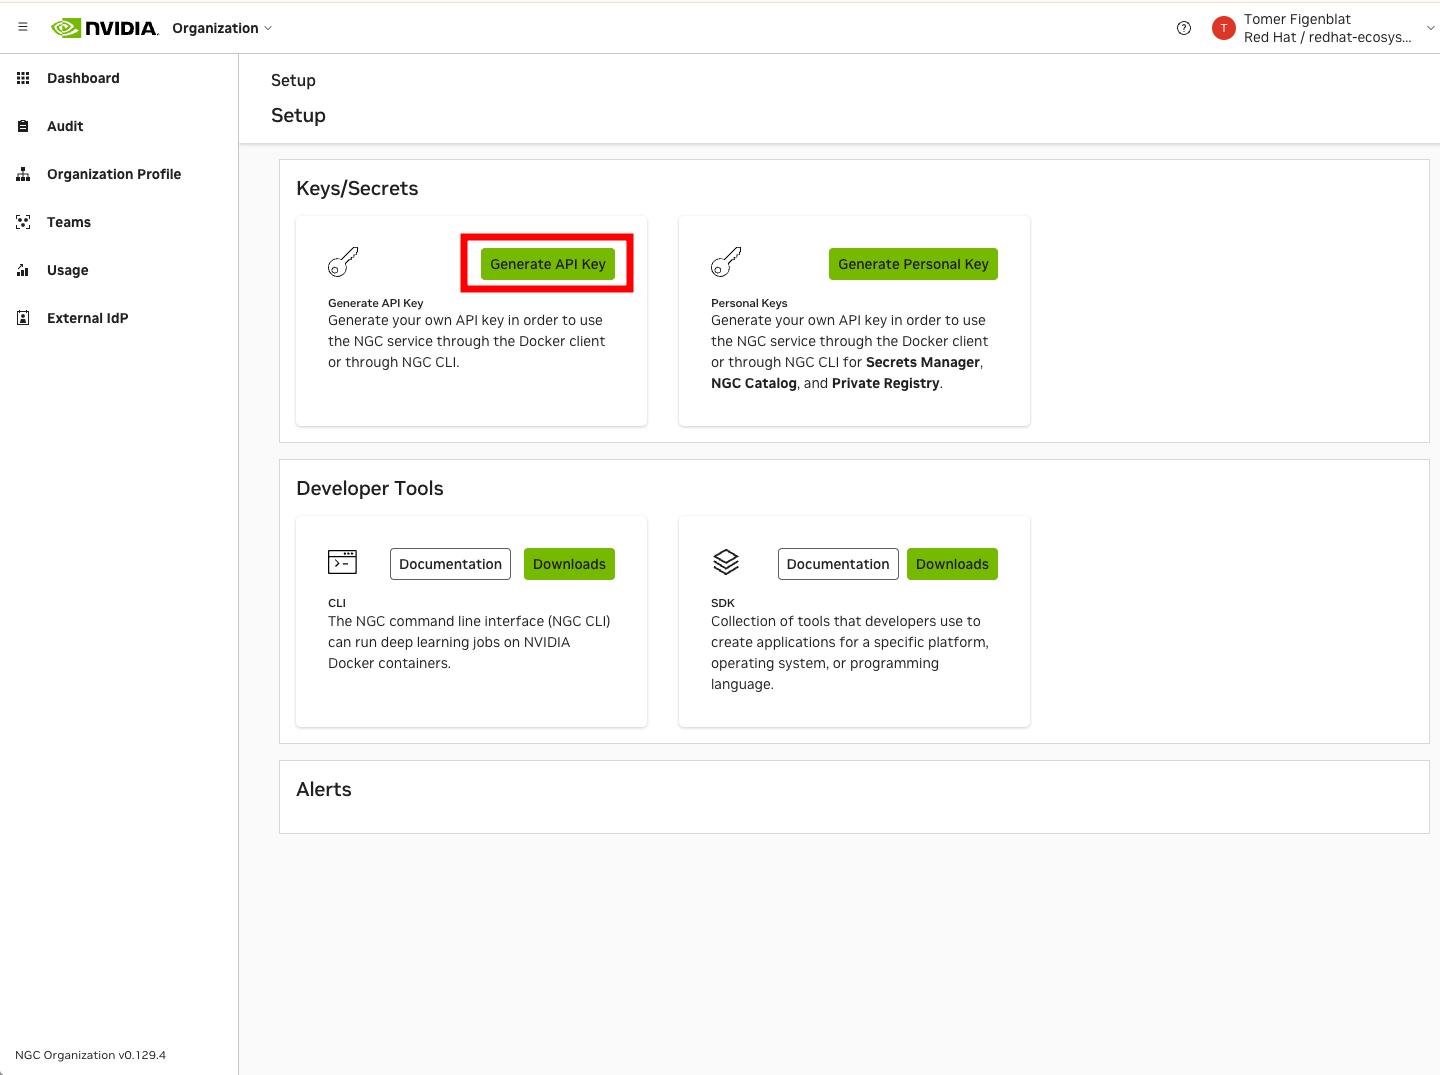
    First, go to the NVIDIA NGC catalog to generate an API key. From the top right profile menu, select the Setup option and click to generate your API key, as shown in Figure 1.
    Change me.
    Figure 1: Generate the API key to use the NVIDIA NGC catalog.

    In your Red Hat OpenShift AI dashboard, locate and click the NVIDIA NIM tile. See Figure 2.
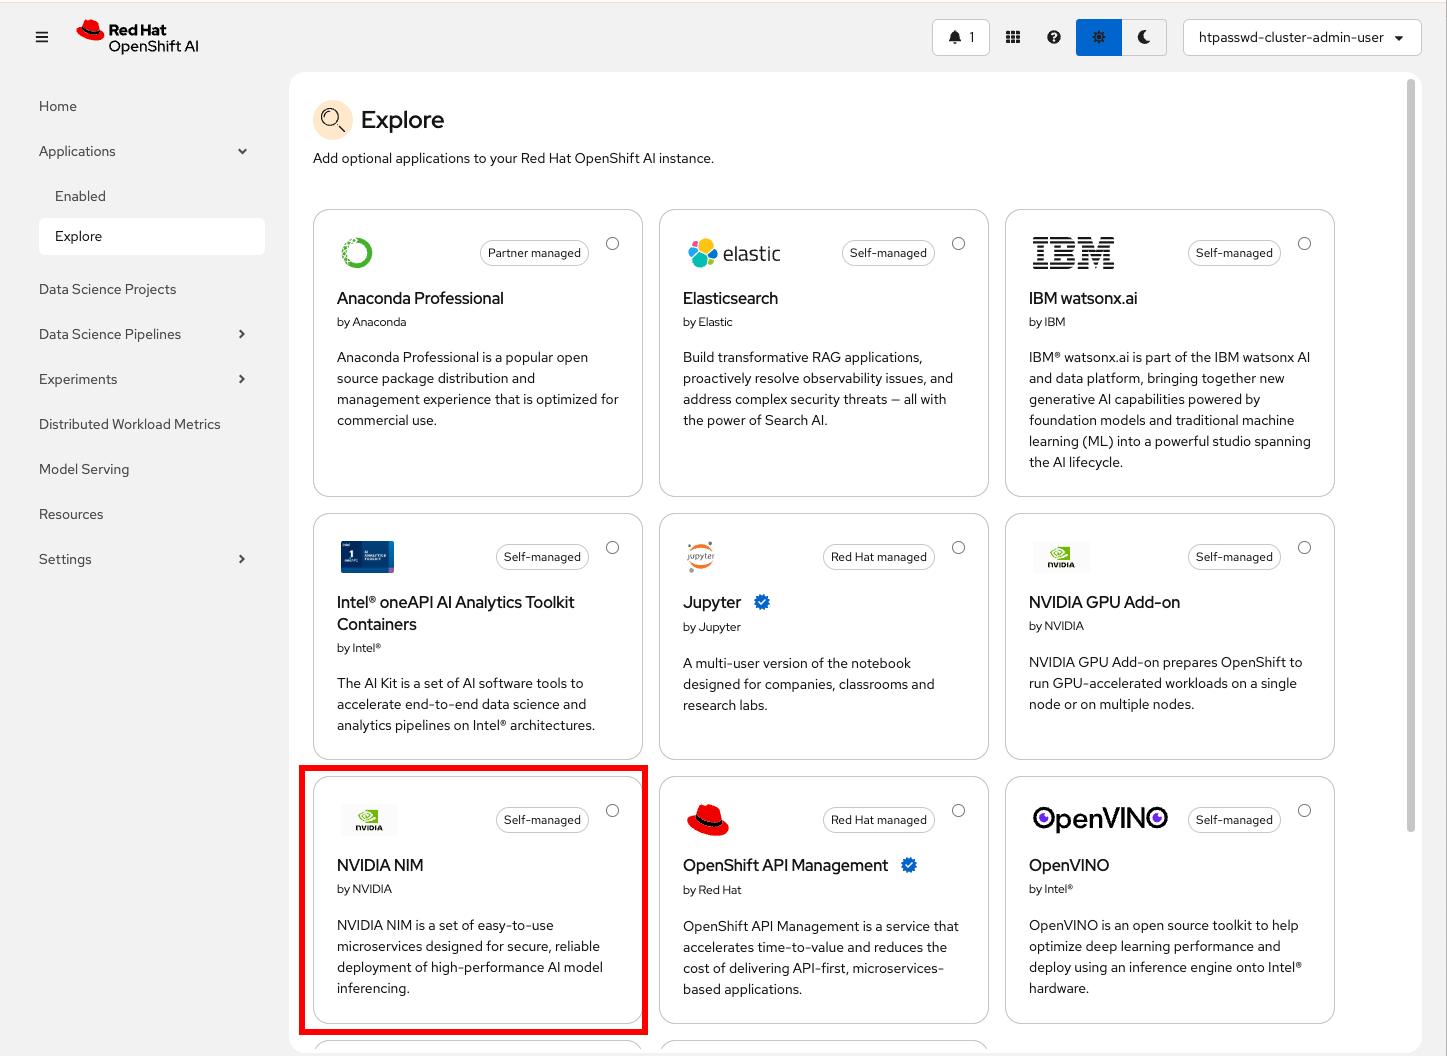
    Figure2: Locate NVIDIA NIM app in your OpenShift AI instance.
    Figure 2: Explore and locate NVIDIA NIM app in your OpenShift AI instance.

    Next, click Enable and input the API key that you generated from the NVIDIA NGC catalog in the previous step (Figure 1), and click Submit to enable NVIDIA NIM. See Figure 3.

    Note

    Enabling NVIDIA NIM requires being logged in to OpenShift AI as a user with OpenShift AI administrator privileges.

    eafaeda
    Figure 3: Enable NVIDIA NIM.

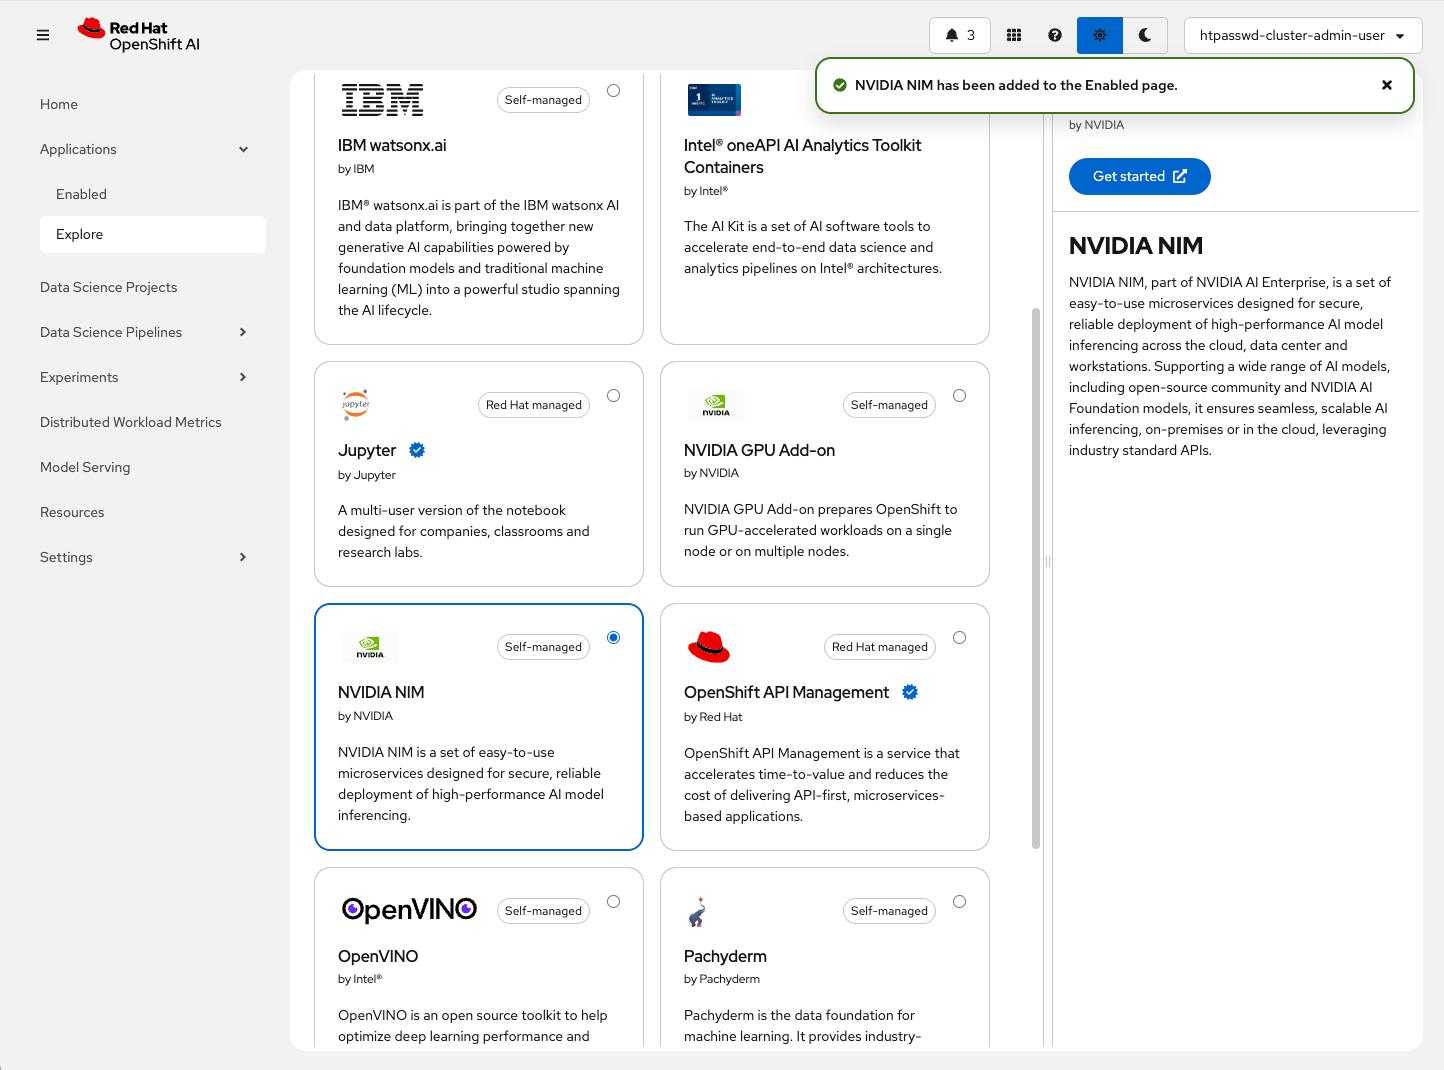
    Watch for the notification informing your API key was validated successfully. See Figure 4.
    daada
    Figure 4: Verify validation of the API key.

    Verify the enablement by selecting the Enabled option from the left navigation bar, as marked in Figure 4. Note the NVIDIA NIM card as one of your apps. See Figure 5.

    daadfda
    Figure 5: Verify NVIDIA NIM enablement.

    Create and deploy a model

    Next, we will create a data science project. Data science projects allow you to collect your work—including Jupyter workbenches, storage, data connections, models, and servers—into a single project.

    From the left navigation bar, select Data Science Projects, and click to create a project. Enter a project and description name, then click Create, as shown in Figure 6.

    eada
    Figure 6: Create a new data science project.

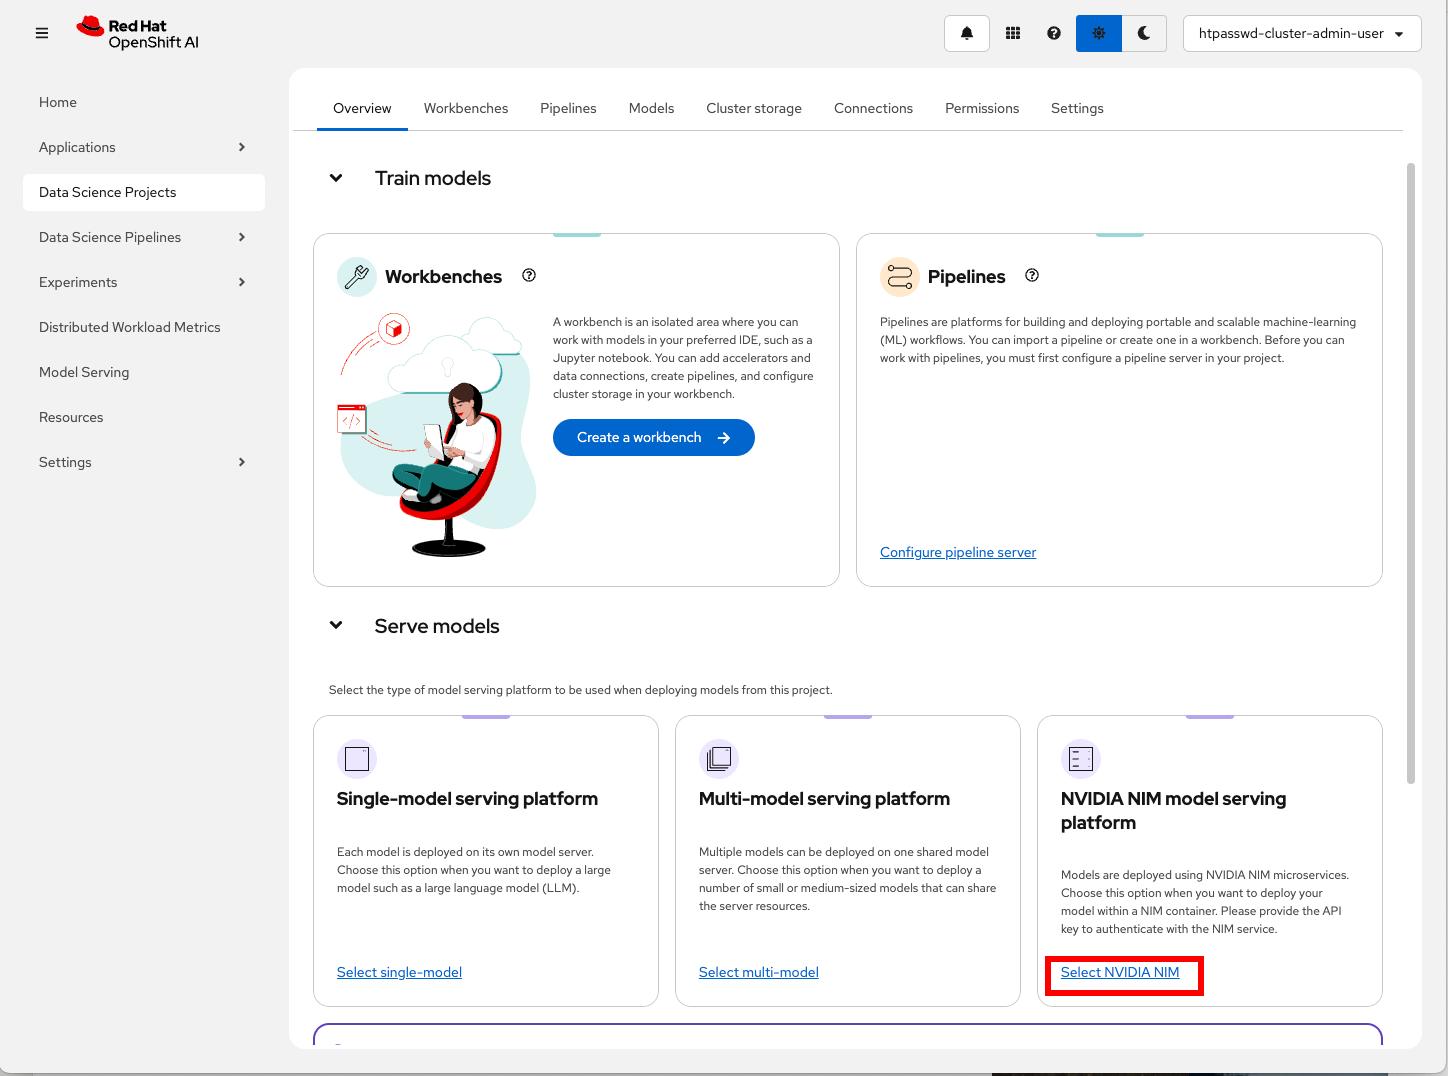
    Once the project is created, select the model serving platform for your project, demonstrated in Figure 7.
    DFSA
    Figure 7: Select a model serving platform.

    After selecting the platform, you will be able to click Deploy model; see Figure 8.

    fafas
    Figure 8: Click to configure a model serving deployment.

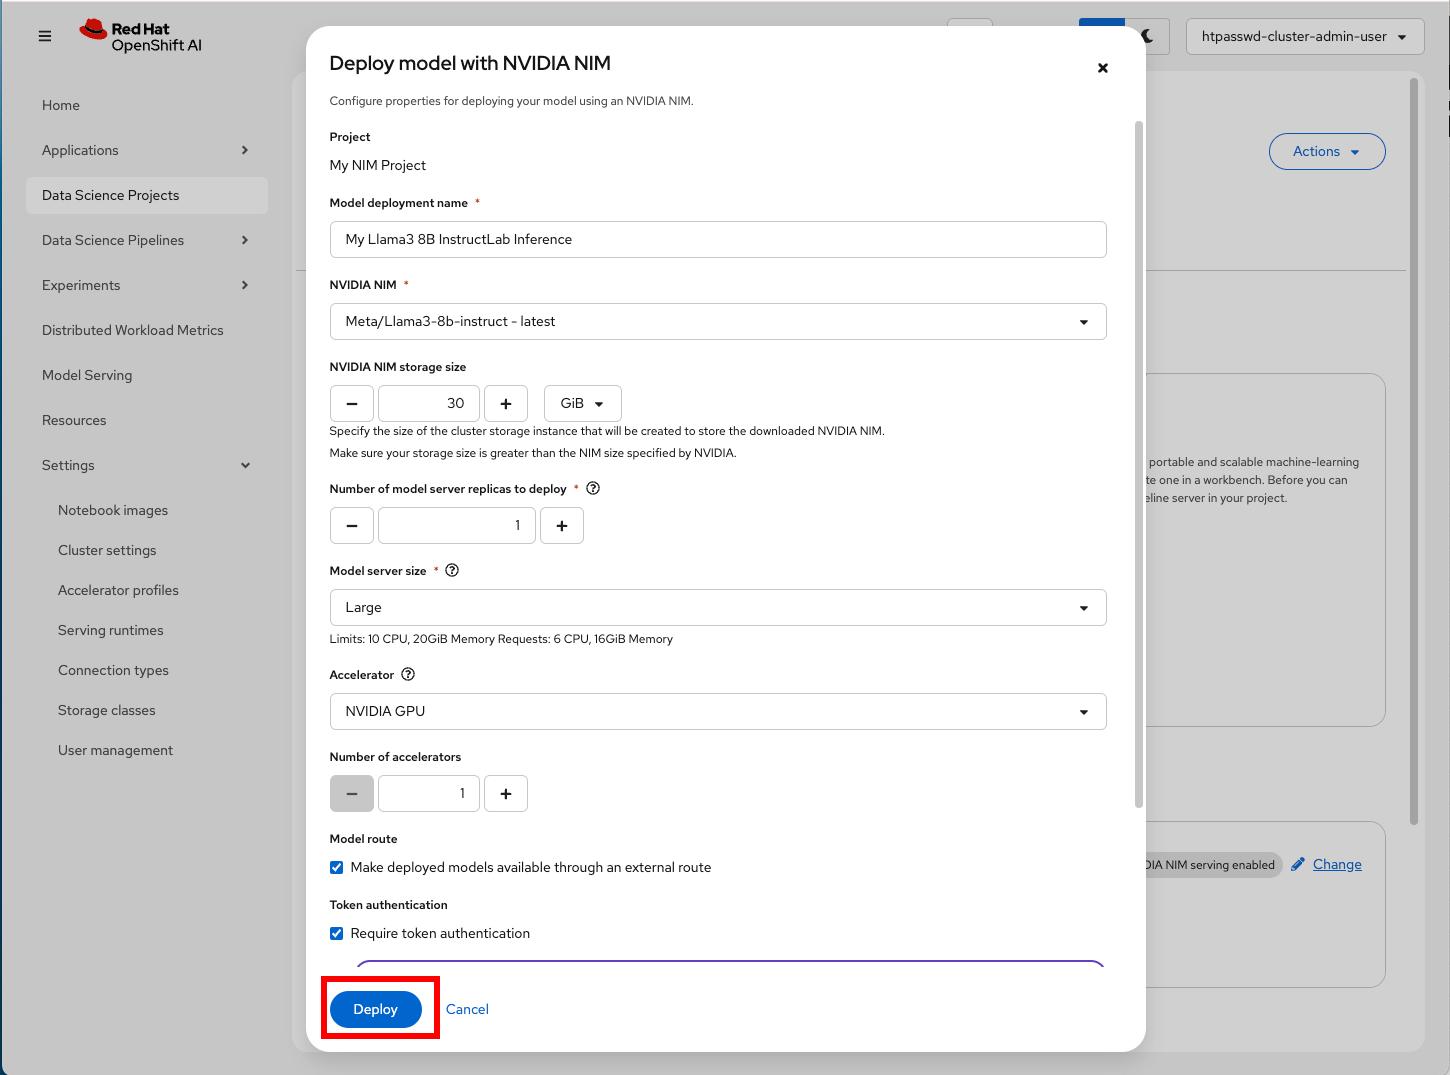
    Select your desired model, configure your deployment, and click Deploy. Check Figure 9.
    dada
    Figure 9: Describe the model serving and deploy it.

    Wait for the model to be available. See Figure 10.

    daa
    Figure 10: A green check mark appears in the tile when the model is available.

    Switch over to the Models tab and take note of your external URL and access token. These are marked in Figure 11.

    ddd
    Figure 11: Grab model's external URL and token from the Models tab of the project.

    Configure and create a workbench

    Now that the model is deployed, let’s create a workbench. A workbench is an instance of your development environment. In it, you'll find all the tools required for your data science work.

    From the same Data Science Projects Overview tab (or the Workbenches tab), click Create a workbench, as shown in Figure 12.

    dd
    Figure 12: Click to create a workbench.

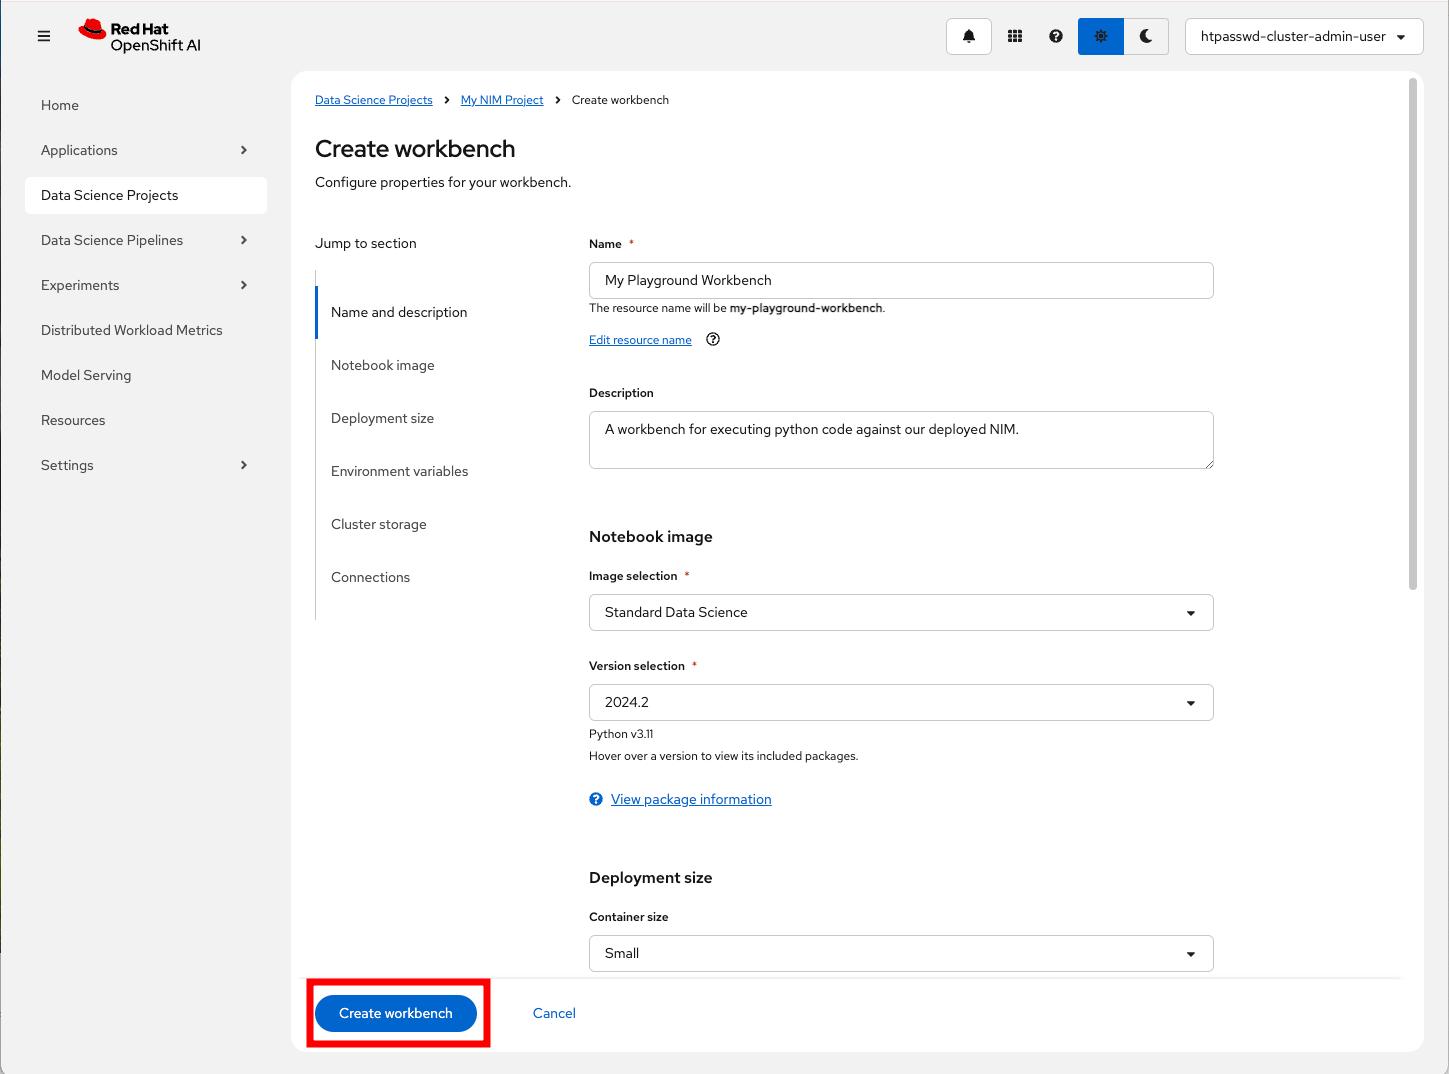
    Describe and create your workbench. Follow Figure 13.
    ffs
    Figure 13: Describe and deploy your Workbench.

    Wait for the workbench to be in a running state and click Open, as seen in Figure 14. You'll return to the opened workbench next.

    fssdf
    Figure 14: Open the workbench when running.

    Execute example code

    To demonstrate the model accessibility, we'll use the code excerpt from NVIDIA's build cloud. We will use it from the workbench we previously created, replacing only the URL and the token in the excerpt with the ones from our deployed model.

    Locate your model of choice in NVIDIA build cloud and copy the example excerpt, demonstrated in Figure 15. Following Figure 15 is the code snippet used in this example.

    dadfada
    Figure 15: Copy example excerpt from NVIDIA's build cloud.
    from openai import OpenAI
    client = OpenAI(
      base_url = "http://integrate.api.nvidia.com/v1",
      api_key = "$API_KEY_REQUIRED_IF_EXECUTING_OUTSIDE_NGC"
    )
    completion = client.chat.completions.create(
      model="meta/llama3-8b-instruct",
      messages=[{"role":"user","content":""}],
      temperature=0.5,
      top_p=1,
      max_tokens=1024,
      stream=True
    )
    for chunk in completion:
      if chunk.choices[0].delta.content is not None:
        print(chunk.choices[0].delta.content, end="")
    

    Switch to the workbench you opened in Figure 14, launch a new Python Notebook, and install the openai library required to run this example. See Figure 16 (again, the snippet will follow).

    caca
    Figure 16: Install the openai Python library inside the Workbench.
    !pip install openai

    In the same notebook, paste the code excerpt from Figure 15, replacing base_url and api_key with the external URL and token you noted in Figure 11, and execute it. See example in Figure 17.

    dadas
    Figure 17: Execute modified excerpt from the Workbench against the deployed model's external URL.

    Observe metric graphs

    Now that your model is up and running, and you have an environment to work from, let's observe the model serving's performance.

    From your project's Models tab, click the model's name, and observe the endpoint performance metric graphs shown in Figure 18.

    ddd
    Figure 18: Observe performance metrics.

    Switch to the NIM Metrics tab and observe NIM-specific inference-related metric graphs. See Figure 19.

    ddd
    Figure 19: Observe NIM-specific metrics.

    Get started with NVIDIA NIM on OpenShift AI

    We hope you found this short tutorial helpful!

    NVIDIA NIM integration on Red Hat OpenShift AI is now generally available. With this integration, enterprises can increase productivity by implementing generative AI to address real business use cases like expanding customer service with virtual assistants, case summarization for IT tickets, and accelerating business operations with domain-specific copilots.

    Get started today with NVIDIA NIM on Red Hat OpenShift AI. You can also find more information on the OpenShift AI product page.

    Last updated: June 11, 2025

    Related Posts

    • How to use AMD GPUs for model serving in OpenShift AI

    • Why GPUs are essential for AI and high-performance computing

    • How InstructLab enables accessible model fine-tuning for gen AI

    • Deploy a coding copilot model with OpenShift AI

    • How to fine-tune Llama 3.1 with Ray on OpenShift AI

    • Model training in Red Hat OpenShift AI

    Recent Posts

    • Storage considerations for OpenShift Virtualization

    • Upgrade from OpenShift Service Mesh 2.6 to 3.0 with Kiali

    • EE Builder with Ansible Automation Platform on OpenShift

    • How to debug confidential containers securely

    • Announcing self-service access to Red Hat Enterprise Linux for Business Developers

    What’s up next?

    This hands-on learning path demonstrates how retrieval-augmented generation (RAG) works and how users can implement a RAG workflow using Red Hat OpenShift AI and Elasticsearch vector database.

    Start the activity
    Red Hat Developers logo LinkedIn YouTube Twitter Facebook

    Products

    • Red Hat Enterprise Linux
    • Red Hat OpenShift
    • Red Hat Ansible Automation Platform

    Build

    • Developer Sandbox
    • Developer Tools
    • Interactive Tutorials
    • API Catalog

    Quicklinks

    • Learning Resources
    • E-books
    • Cheat Sheets
    • Blog
    • Events
    • Newsletter

    Communicate

    • About us
    • Contact sales
    • Find a partner
    • Report a website issue
    • Site Status Dashboard
    • Report a security problem

    RED HAT DEVELOPER

    Build here. Go anywhere.

    We serve the builders. The problem solvers who create careers with code.

    Join us if you’re a developer, software engineer, web designer, front-end designer, UX designer, computer scientist, architect, tester, product manager, project manager or team lead.

    Sign me up

    Red Hat legal and privacy links

    • About Red Hat
    • Jobs
    • Events
    • Locations
    • Contact Red Hat
    • Red Hat Blog
    • Inclusion at Red Hat
    • Cool Stuff Store
    • Red Hat Summit
    © 2025 Red Hat

    Red Hat legal and privacy links

    • Privacy statement
    • Terms of use
    • All policies and guidelines
    • Digital accessibility

    Report a website issue