In previous articles, I discussed why developers should use MicroShift as their local Kubernetes for inner loop testing of applications, and I demonstrated how to easily run MicroShift using OpenShift Local. In those articles, I cautioned that running the Red Hat build of MicroShift requires a Red Hat Enterprise Linux (RHEL) virtual machine (VM), and that it was not easy to run MicroShift as a container.
Well, now there is an easy way. The MicroShift in Container (MINC) project provides a command-line tool, which downloads and sets up running MicroShift as a container. It is available for Windows, MacOS, and Linux. MINC uses the container engine available within these operating systems, either Docker or Podman.
This article explains how MINC differs from the Red Hat build of MicroShift, so you can assess whether it meets your needs, or if Red Hat OpenShift Local with the MicroShift preset is a better option for you. Then, I will demonstrate how you can use MINC on a Fedora Linux system. After learning these steps, you should be able to repeat the process on other Linux distributions and operating systems supported by MINC.
From upstream Kubernetes to OpenShift
Figure 1 contrasts MINC with other ways of running MicroShift, and also with Red Hat OpenShift and other lightweight Kubernetes, such as kind.
Starting from the righthand side of the image are the production-like deployments of OpenShift with enterprise support, high availability (HA), a choice of operators from Red Hat, and certified operators from third-party vendors.
To the left are the lightweight deployment options more likely to fit comfortably on your work or personal machine. Note that they may not provide all of the benefits from OpenShift, but may be sufficient for your needs as a developer.
The post-it notes under each icon highlight the key features each component adds compared to the icons to the left. This is not a comprehensive list, but it provides highlights of the benefits that justify higher resource consumption.
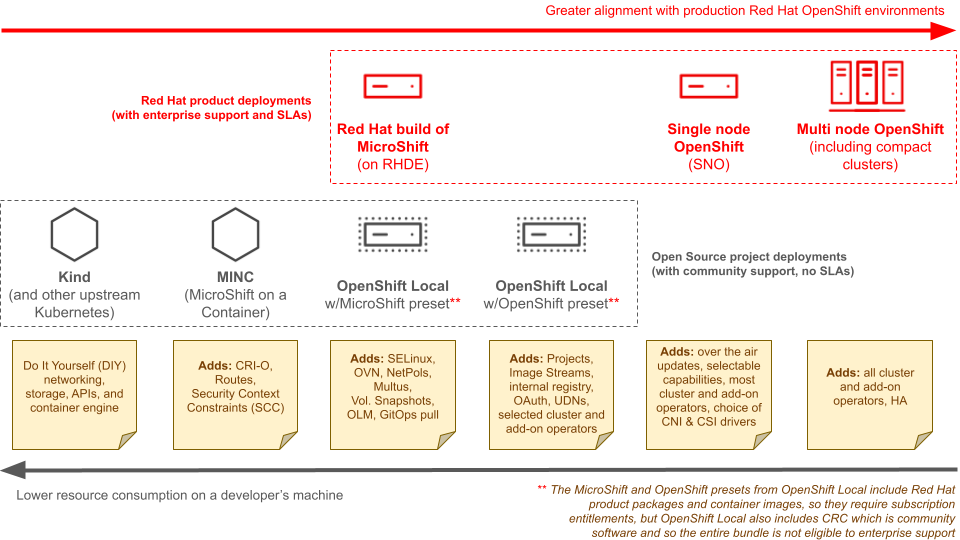
A number of important features from OpenShift are not explicit in the Figure 1, such as support for multiple runtime classes that enable running pods with sandboxed containers and confidential containers. Various cluster and add-on operators provide these features.
In comparison to other community container-based Kubernetes, (i.e., kind) MINC offers OpenShift capabilities, including the Routes and SecurityContextConstraint (SCC) OpenShift extension APIs, which allow you to take advantage of those APIs.
Another key difference between MINC and other Kubernetes-based options is that MINC incorporates the CRI-O container engine, which further aligns to the runtime behavior of MINC with Red Hat OpenShift.
However, in order for MINC to operate without a dependency on RHEL system services, MINC does not utilize OVN networking and LVM storage. Instead, MINC uses the Flannel CNI and includes no built-in storage provisioner. As a consequence, MINC does not provide a few important APIs out-of-the-box, such as network policies and volume snapshots. These APIs are important for production application deployments, but likely optional for development inner loop.
MINC is the easy version of MicroShift
MINC is built from OKD and CentOS Stream CoreOS code as well as their community container images. This is unlike the Red Hat build of MicroShift, which is built from the Red Hat OpenShift Container Platform source code and reuses OpenShift product container images for components (i.e., core DNS, ingress controller, and its CSI and CNI drivers).
This architecture results in the removal of certain requirements imposed by Red Hat build of Microshift, such as the need for a Red Hat product subscription, entitlement, or even a free Red Hat Developer subscription.
The simpler architecture of MINC, when compared to the Red Hat build of MicroShift, makes MINC viable on non-RHEL and non-Linux hosts, enabling running MINC from either a Docker or Podman container on Windows and Mac.
How to create a MINC cluster
MINC is distributed as a single binary with no dependencies. Just download it and copy to a directory in your command path. The exact steps depend on your operating system. But once you properly install it, you should be able to check the version and status of MINC:
$ minc version
version: 0.0.11
$ minc status
{
  "container": "stopped",
  "apiserver": "stopped",
  "error": "no microshift containers found, use 'create' command to create it"
}
$ minc list
time=2025-06-26T19:26:22.369-04:00 level=ERROR msg="error listing cluster" err="no microshift containers found, use 'create' command to create it"found, use 'create' command to create it"
Observe that this output reports no clusters as an error. However, this output is expected given that no clusters were created previously.
Note:
At the time of this article, MINC cannot run as a rootless container. Underneath, MINC transparently invokes sudo or the associated escalation mechanism for the target operating system as needed.
Next create a MINC cluster, which downloads the MicroShift community container image and then starts the container.
$ minc create
time=2025-06-26T19:26:47.010-04:00 level=INFO msg="Ensuring cluster image (quay.io/minc-org/minc:4.18.0-okd-scos.9-amd64) ..."
-time=2025-06-26T19:26:49.590-04:00 level=INFO msg="Waiting for MicroShift service to start..."
-time=2025-06-26T19:29:37.419-04:00 level=INFO msg="Waiting for KubeConfig ..."
\time=2025-06-26T19:29:39.082-04:00 level=INFO msg="Waiting for pods to be ready..."
time=2025-06-26T19:29:59.222-04:00 level=INFO msg="Cluster created"
The result is a single container running all of the capabilities provided: the baseline Kubernetes components, including the API server and etcd, in addition to other core components, such as the CRI-O container engine and the OpenShift API server. You can monitor and manage that container as you would with any regular container, for example:
$ sudo podman ps
CONTAINER ID  IMAGE                                       COMMAND  CREATED   STATUS   PORTS                                                             NAMES
c4ec43660e79  quay.io/minc-org/minc:4.18.0-okd-scos.9-amd64  /sbin/init  3 minutes ago  Up 3 minutes  127.0.0.1:6443->6443/tcp, 127.0.0.1:9080->80/tcp, 127.0.0.1:9443->443/tcp  microshift
Notice that the minc command does not provide start and stop verbs. If you want to shut down your MicroShift cluster before turning off your computer and start it again the next day, use the halting capability of your container engine as follows:
$ sudo podman stop microshift
microshift
... after reboot
$ sudo podman start microshift
microshift
At any time, you can use the status and list verbs to check if you have a running MINC cluster.
$ minc status
{
  "container": "running",
  "apiserver": "running"
}
flozano@p50:~$ minc list
microshift 127.0.0.1:6443->6443/tcp, 127.0.0.1:9080->80/tcp, 127.0.0.1:9443->443/tcp running
You can also use the minc create command to restart your existing microshift container, without loss of any state on its ephemeral storage, and continue working with applications already deployed.
Accessing a MINC cluster
The minc create command edits your default Kubeconfig file so that the kubectl and oc utilities connect to MINC using the microshift context as the default context. You must install these tools yourself beforehand. As a side note, I prefer to use the oc command over kubectl, despite the fact that some oc features won't work with MicroShift.
$ oc whoami
system:admin
$ oc whoami --show-server
http://127.0.0.1.nip.io:6443
The use of an nip.io domain provides an easy way to reference your MicroShift cluster without a more sophisticated networking setup.
As expected, your MicroShift cluster contains a single node as the output shows:
$ oc get nodes
NAME            STATUS   ROLES                      AGE  VERSION
127.0.0.1.nip.io   Ready control-plane,master,worker   2m59s   v1.32.3
If you’re quick enough, you may see a number of pods still initializing once the minc create command completes. Wait until all of the pods are running and ready before attempting to do anything else.
$ oc get pod -A
NAMESPACE           NAME                                    READY   STATUS RESTARTS     AGE
kube-flannel        kube-flannel-ds-nm956                   1/1  Running   1 (7m55s ago)   8m51s
kube-proxy          kube-proxy-cc4ss                        1/1  Running   0            8m50s
kube-system         csi-snapshot-controller-75d84cb97c-fztcz   1/1  Running   0            9m
openshift-dns       dns-default-69jc2                       2/2  Running   0            8m26s
openshift-dns       node-resolver-wm6xc                     1/1  Running   0            8m53s
openshift-ingress   router-default-76cdd4b765-kl65w         1/1  Running   0            8m58s
openshift-service-ca   service-ca-df6759f9d-7mvzd              1/1  Running   0            8m57s
From now on, you can create namespaces for your applications. If you prefer, create service accounts so you can access your Minc cluster without cluster administrator privileges, which I strongly recommend doing this.
If you jump between multiple local and remote Kubernetes clusters like I do, it’s easy to misconfigure your Kubeconfig file, resulting in potentially losing the certificates required to access your MINC instance as a cluster administrator.
The following command recreates the microshift context adds the credentails the current MINC cluster into your default Kubeconfig file:
$ minc generate-kubeconfig
kubeconfig generated and context is added to default config
Deploying a simple web application
Let’s deploy a "hello, world" application to prove that the creation of an application on MINC works as expected and to demonstrate how to access applications running on MINC.
$ oc create namespace test
namespace/test created
$ oc project test
Now using project "test" on server "http://127.0.0.1.nip.io:6443".
$ oc create deployment hello --image quay.io/flozanorht/php-ubi:9
deployment.apps/hello created
$ oc expose deployment hello --port 8080
service/hello exposed
$ oc expose service hello
route.route.openshift.io/hello exposed
The oc project command provides a simpler method to change namespaces over the kubectl config set-context --current --namespace command typically used with standard Kubernetes. This way, there is no need to add -n test to all oc commands.
Note:
The oc project command works with MicroShift because it does not require the Projects API, which is absent. Other oc commands related to projects, such as oc new-project, would not work with MicroShift.
Wait until your application pod is running. Then, retrieve the hostname of the Route.
$ oc get pod
NAME                  READY   STATUS           RESTARTS   AGE
hello-749ccf6c99-qpjxr   0/1  ContainerCreating   0       20s
$ oc get pod
NAME                      READY   STATUS RESTARTS   AGE
hello-749ccf6c99-qpjxr   1/1  Running   0       59s
$ oc get route hello
NAME HOST                            ADMITTED   SERVICE   TLS
hello   hello-test.apps.127.0.0.1.nip.io   True    hello
Notice that the Route also uses the nip.io domain. However, if you try to invoke the location right away, it will fail.
$ curl hello-test.apps.127.0.0.1.nip.io
curl: (7) Failed to connect to hello-test.apps.127.0.0.1.nip.io port 80 after 165 ms: Could not connect to server
If you paid attention to the previous podman ps and minc list commands, you'd notice that MINC redirects local port 9080 to port 80 on the container. So you must use port 9080 to access the OpenShift routes. If you need TLS-based services, you should use port 9443.
$ curl hello-test.apps.127.0.0.1.nip.io:9080
<html>
<body>
Hello, world!
</body>
</html>
Options are available to configure for HTTP and HTTP ports exposed by the MINC container using the minc create command.
How to deploy Red Hat containers
Since MINC is community software, the installation process does not require an OpenShift pull secret. That pull secret enables OpenShift and the Red Hat build of MicroShift to pull containers from Red Hat products, including container images for databases and other RHEL packages not included in the Red Hat Universal Base Image (UBI) repositories.
If you need to run Red Hat containers on MINC to test your application with the same dependencies it would require for a production deployment., then you can add an OpenShift pull secret to your Kubernetes namespaces.
Assuming your OpenShift pull secret has been downloaded and is available in a file called pull-secret, use the following command to create the secret. Configure it as a pull secret for the default service account of your namespace.
$ oc create secret generic redhat-pull-secret \
--from-file .dockerconfigjson=./Downloads/pull-secret \
--type kubernetes.io/dockerconfigjson
secret/redhat-pull-secret created
$ oc secrets link default redhat-pull-secret --for pull
# the command produces no output
To validate that the pull secret works, let’s deploy a MySQL database using RHEL container images.
$ oc create deployment db  --replicas 0 --image registry.redhat.io/rhel9/mysql-80
deployment.apps/db created
$ oc set env deployment/db MYSQL_DATABASE=test MYSQL_USER=user MYSQL_PASSWORD=test123
deployment.apps/db updated
$ oc scale deployment/db --replicas 1
deployment.apps/db scaled
For simplicity, I included the database user credentials directly in the deployment, and I trust you to know this is not the recommended approach. Rather, you would create a secret and configure your deployment manifest to refer to the username and password from that secret.
Wait until your database pod is ready and running to create a TCP tunnel using the oc port-forward command as follows:
$ oc get pod
NAME                  READY   STATUS RESTARTS   AGE
db-69f5db5865-nbmv4   1/1  Running   0       96s
hello-749ccf6c99-qpjxr  1/1  Running   0       74m
$ oc port-forward $(oc get pod -o name -l app=db) 3306:3306
Forwarding from 127.0.0.1:3306 -> 3306
Forwarding from [::1]:3306 -> 3306
Leave the tunnel open. Then from another shell, connect to the database (assuming you have the MySQL CLI client already installed on your machine).
$ mysql -h127.0.0.1 -uuser -ptest123 test
...
Type 'help;' or '\h' for help. Type '\c' to clear the current input statement.
mysql> show databases;
+--------------------+
| Database        |
+--------------------+
| information_schema |
| performance_schema |
| test            |
+--------------------+
3 rows in set (0.00 sec)
mysql> exit
Bye
You can now return to the previous terminal and stop the oc port-forward command once complete.
Issues from the 0.x release
MINC is a new project, so you may face a few rough edges. I already cautioned you about the following issues in the previous sections:
- The need to run MicroShift as a rootful container.
- Error messages from
minc listwhen no clusters have been previously defined.
These and other issues may already be fixed when you read this article, but I will add a few more that I encountered in my usage of MINC, so you won't be surprised if you experience them.
The
minc createcommand may throw an error similar to the following:-time=2025-05-07T16:14:44.006-04:00 level=INFO msg="Waiting for pods to be ready..." time=2025-05-07T16:15:04.166-04:00 level=ERROR msg="error creating cluster" err="operation failed after multiple attempts: pod kube-flannel-ds-nm956 in namespace kube-flannel is not running. Current status: Pending"Despite that error, I got a working
microshiftcontainer running a healthy MicroShift cluster with all pods running just fine every time. The defined timeout may be too low which results in the error.- MINC does not yet include any storage provisioner nor CSI driver, so it cannot dynamically provision PersistentVolumes for your PersistentVolumeClaims (PVCs). You must use emptyDir volumes for all your pods, and if you recreate your MINC cluster, you will lose all data on those volumes.
Despite these issues, I find that MINC is already very useful, and these are merely minor annoyances as opposed to dealbreakers.
More to come
MINC provides an easy way to run a community version of MicroShift as a single container on your desktop operating system. It provides a lightweight environment for inner loop testing of applications targeting either the Red Hat build of MicroShift or Red Hat OpenShift, and it is a nice alternative to other local Kubernetes distributions, such as kind.
MINC does not provide all features and capabilities of the Red Hat build of MicroShift. If you need any of these assets, you can try OpenShift Local with the MicroShift preset to run MicroShift in a VM.
The MINC project is in its early stages and presents a few quirks, but it is maturing rapidly. Stay tuned for features to come in the near future, such as the Podman Desktop extension. You can check a nice tutorial on using MINC with Podman Desktop here on Red Hat Developers.
Special thanks to Andrew Block, Kevin Chung, Luca Ferrari, and Praveen Kumar for their reviews of drafts of this article.
